|
Chevy Volt Batteries |
|
Chevy Volt Batteries There were two 2015 Riding Season Goals involving batteries. They were:
|
|
Chevy Volt Battery Re-Use, Key Learnings - April - October 2015 CAUTION!!!!: March 1, 2017. Lithium Batteries are extremely dangerous and should not be operated without a BMS to ensure they operate within safe limits for cell voltage, current and temperature. DO NOT under any circumstances attempt to operate a Lithium Based Battery system without an automatic battery control system. Cell voltages must be strictly preserved or the battery system can self-destruct in ways that cause extreme danger to persons and property. CAUTION!!!!: March 1, 2017. Battery Systems contain hazardous voltages and can hurt or kill you without warning. If you have not had specific training in battery and electrical/electronic systems, DO NOT attempt to disassemble or repurpose Electric Vehicle batteries. Experiments gone wrong can cause you damage and cause needless legisalation and bad publicity for Electric Vehicles and the renewable energy industry. So, if you are cheap and don't want to spend a lot of money to get a safe, well designed battery system, go to school and get training in how to work on these systems before you start working on this type of project (or just wait a few years, because the price of battery systems is coming down very quickly). While a Chevy Volt Battery can be cut into pieces and re-used, the ideal re-use would be to use the entire pack assembly as it came out of the vehicle with it's BMS and awesome thermal control system intact and functioning. Ideally, LG Chem and GM will eventually share information so that we can make an aftermarket wiring harness that will allow this pack to be mounted verically on a wall in someones garage to provide stationary energy storage for residential applications aka "The Chevy Volt PowerWall" I DO NOT RECOMMEND cutting a pack into pieces!!! It is VERY dangerous to yourself and to the battery. There is a phenomenal amount of energy stored in each cell. If you accidently short one of these cells really bad things can happen instantly (vaporized metals to breath, molten metal to burn you and the battery, battery fires, arc flashes that can damage your eyes, etc.). And, there is the very easy chance of just ruining the battery by cutting a cell pouch open. I also DO NOT RECOMMEND running a Lithium pack without a BMS or automatic shut down circuits for over or undervoltage condtions. I recommend keeping the modules together in their factory build configuration and attempting to use the heating/cooling features of the module design. I recommend keeping the bottom mounting features intact. Nissan Leaf modules are easier re-package and re-use than Chevy Volt modules from a mounting standpoint. |
|
Chevy Volt Battery Pack for Experimentation - April 30, 2015 Here is a 16 kWh Volt Battery pack from a 2012 Volt with 14,000 miles on it. It cost $2,400 at a local salvage yard. 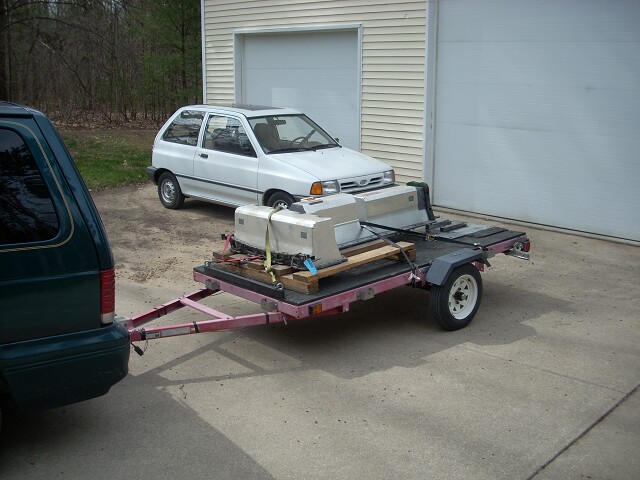 With cover removed. I can make three very nice 5 kWh, 96 Volt battery packs out of this battery. I could mount these in one to three motorcycles or in my car. I will experiment with each. 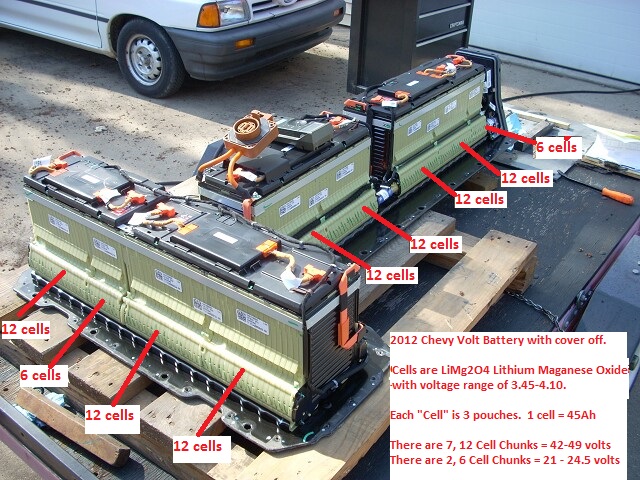 Weight of 5 kWh portion of pack = 105# This will have a charged voltage of 110VDC. This should boost my maximum speed to 75mph. This pack will reduce my bikes weight by 100#, eliminate the exterior battery packs that make the bike top heavy, remove the exterior battery packs leaving room for more storage or chargers, double my available horse power. All this should make the bike even more fun to run! 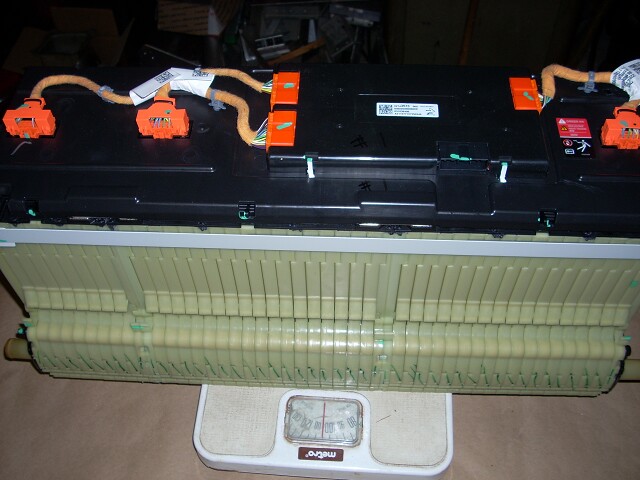 Where 5kWh base pack will be mounted (pack is highlighted in yellow) 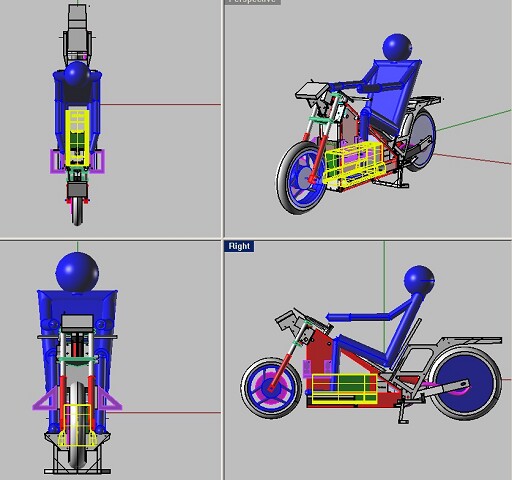 |
|
Recycling Chevy Volt Battery Packs - April 30, 2015 From these videos and forum, I learned how to purchase and take apart a Chevy Volt Pack with safety and confidence. For some excellent information about what a used Chevy Volt Pack has to offer, see this video: Used Volt Pack Performance For some excellent information about taking Chevy Volt Packs apart see this video: Disecting a Volt Pack Great discussion, leads on pricing, CAD model, cell configuration, etc. DYI Electric Car 2012-chevy-volt-battery-93101.html Data on how well the Volts have been holding up in use. http://avt.inl.gov/phev.shtml |
|
Designing a Pack that with run WITHOUT a BMS - August 29, 2015 To run without a BMS (battery management system), you must start with balanced cells, and then never over-charge or over-discharge the pack. The advantage of having no BMS is that you avoid the cost of the BMS and the complexity (and possilbe failure of the complex system). To not over charge, I decided to build a pack with a max voltage that was higher than my chargers could attain. To not over discharge, I decided to manually monitor system voltage with my Cycle Analyst gage and not go below a safe limit (this is made easier by the linear discharge curve and large voltage swing of Lithium Maganese Oxide chemistry). Here are some specifications of the Chevy Volt Battery Pack:
Source 1: (https://www.youtube.com/watch?v=lIYHMavDUiA&feature=youtu.be&t=2866 ). Caution: This is 2012 Chevy Volt pack, other years might have different internal construction and numbers Manufactured by LG Chem Chemistry: Lithium Maganese Oxide Operating Voltage of Pack: 355V Nomial Amp Hours (Ah): 45 Ah Number of Cells: 288 cells Configuration: 3P96S, 3 Cells in Parallel, 96 in Series Nomial Cell Voltage: 3.7V Cell Voltage Range: 3.5V - 4.1V Pack kWh: 16.5 Actual kW-H used by Chevy Volt: 10.8 kWh (65% of total available) Pack Warranty: 100,000 Miles Electric Range: 35 Miles Peak Power Capability: 250-350 kW in 10 second bursts C Rating: 15-20 Pack Mass: 197.3 kg (435lbs) Source 2: Chevy Volt battery actual performance from ( http://avt.inl.gov/pdf/phev/batteryVolt4313.pdf ): The chart below is very important in that it shows ACTUAL voltage performance of Chevy Volt packs in testing. From this chart we can find the actual absolute Minuimum and Maximum Cell Chemistry volage limits (assuming all cells are perfectly balanced and at the same cell voltage). To protect the batterys from damage we must NEVER exceed these cell limits. In fact, in practice (because the cells won't be perfectly balanced), we must stay way away from the limits, especially if we don't have a BMS doing real time monitoring that has a way to shut down the system. Also, by staying away from the limits we will drastically increase the battery life (cycles). Chart from Chevy Volt battery actual performance from ( http://avt.inl.gov/pdf/phev/batteryVolt4313.pdf ): 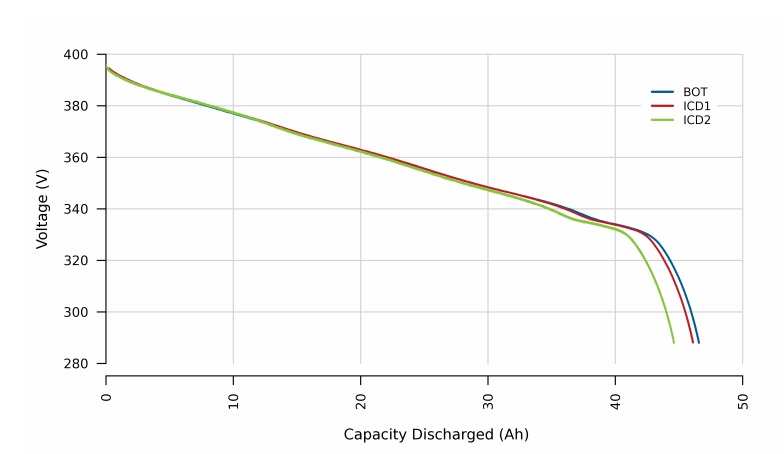 Here are the MAXIMUM limits: To stay away from the "knees of the curve" from the chart we'd not want to exceed 390V or go below 335V. Divide these by the number of cells in the pack and you get the following chemistry limits of the cells: 390V / 96 Cells = 4.06V Chemistry Maximum 335V / 96 Cells = 3.49V Chemistry Minimum. To stay away from the "knees of the curve" from the chart we do not want to exceed 380V or go below 340V. Divide these by the number of cells in the pack and you get the following de-rated, safe limits of the cells: 380V / 96 Cells = 3.96V Maximum 340V / 96 Cells = 3.54V Minimum. 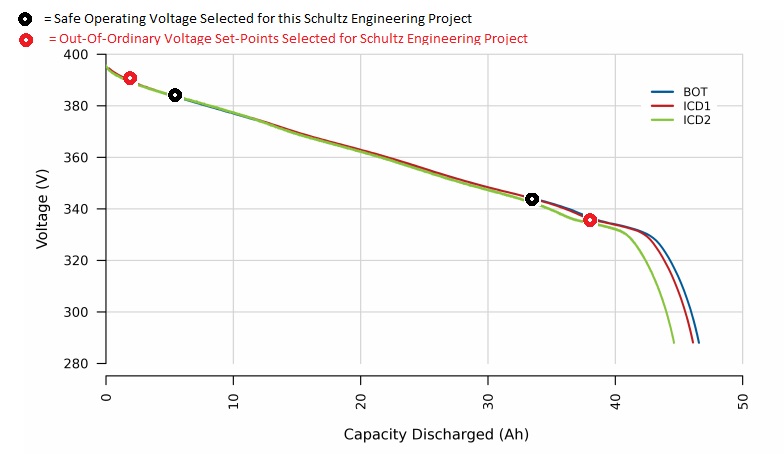 THE PRACTICAL RANGE (For Daily Riding to maximize Cycle Life of Battery): The chargers charge the pack to 112 Volts/28 cells = 4.0 Volts/Cell I discharge the pack to 100 volts / 28 cells = 3.57 volts at rest This gives about 28 Ah at an average voltage of 106V = 2,968 Wh Capacity per battery pack Normally the bike has 2 packs on board (5,936 Wh) Range is directly related to speed. Practical Range at 66Wh/Mile (40-45 mph touring) = 90 miles Practical Range at 75Wh/Mile (slow commuting 45mph where ever traffic not present) = 79 miles Practical Range at 85Wh/Mile (fast commuting posted speed limits) = 70 miles THE OUT-OF-ORDINARY RANGE (Maximum Range for occasional rides): To get more range, I have charged to higher voltages and discharged to lower voltages a few times: I can charge the pack to 114 Volts / 28 cells (Zivan set at higher voltage) = 4.07 Volts/Cell I can discharge the pack to 98 volts / 28 cells = 3.5 volts at rest On one ride where I "high charged" to 114V (External Pack) and 113.4 V (Internal Pack) and discharged both packs to 100V I used 6,267 Wh per the Cycle Analyst (I rode 73.7 miles at commuting traffic speeds at posted speed limits). On this ride, the "high charge" gave 131% = 6,267Wh / 4,770 Wh normal range. Maximum Theoretical Range using "High Charge" and "Low Discharge": With 35Ah / Battery at 106V x 2 batteries = 7,420 Wh MAXIMUM Range at 66Wh/Mile (40-45 mph touring) = 112 miles MAXIMUM Range at 50Wh/Mile (28 mph touring) = 148 miles |
|
Test Ride with 300 Pounds of Battery's - May 3, 2015 This test ride did two things. It verified a 5kWh chunk of the Chevy Volt battery would operate the motorcycle and that the bike handling was good with 100# of batteries mounted high on the tail. NOTE: What I did not realize at the time is that while I had charged the Volt pack to the "normal" voltage of about 112 Volts (that the controller in the bike could handle), when I would charge the battery to just a few volts higher (to get some extra range for a long ride), the controller would literally burn up. See June 25 entry on controllers below for more details... 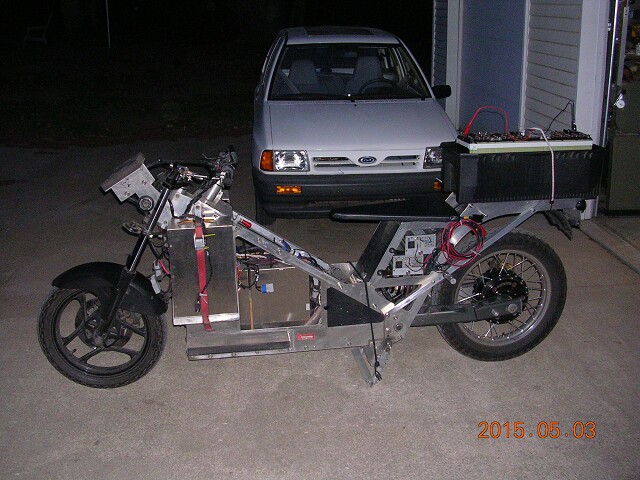 |
|
Breaking the Pack Down - May 6, 2015 I used a bandsaw to cut off the cooling ducts. It's a shame to ruin the liquid cooling of these batteries, but for space constraints in this project, it must be done. There's a lot of retained coolant in the pack -but it's easy to remove with compressed air. 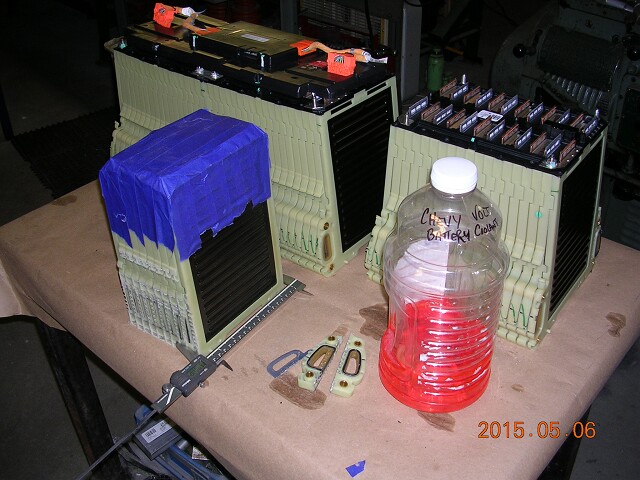 |
|
Chopping Down Width In Detail - May 20, 2015 First of all, DON'T do this you your pack! I've ruined the cooling/heating ability of this pack so that I can fit it in an existing bike frame. I should have redesigned and/or built a new bike to take advantage of this beautiful battery system. Instead, I've greatly reduced it's charge/discharge capabilities and if I overheat it, it's cycle life. The one good thing about this project is we can learn how well the battery will keep cool without water cooling. All the steps shown below are time consuming and dangerous. Successful reuse of these cells should strive to use them in as close a configuration as they were in the Chevy Volt with as little tampering as possible to reduce transition costs and retain system reliability. 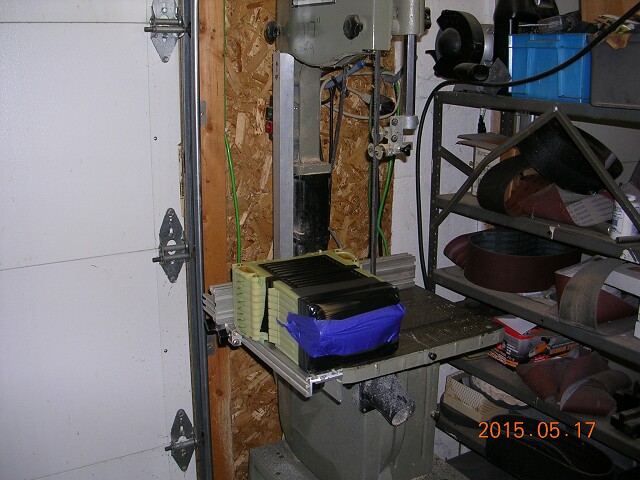 I decided to cut the battery's down the centerline of the bolt holes so that I will have a way to hold the batteries in place in a simular way that they were held in the Chevy volt, but the bottom edge. I found it's best to leave 1/2 of the rubber gaskettes in place when doing the cuts. This will help keep shavings out of between the cells. After cutting, all rubber sealing gaskets were removed. 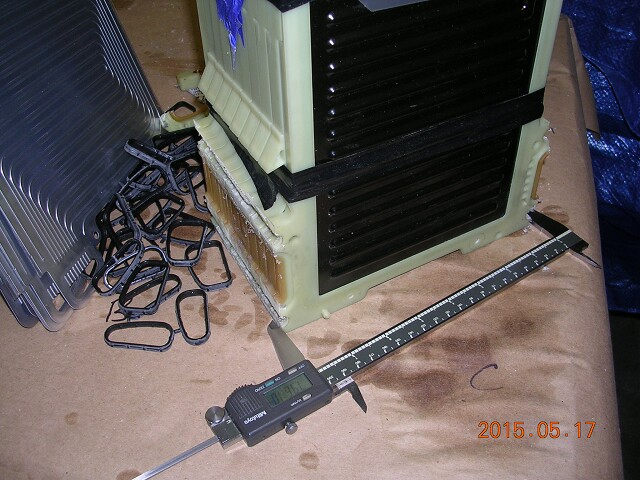 I wanted to retain some ability to cool the cells with the aluminum separators, so I removed the aluminum cooling separators before cutting the sides off. 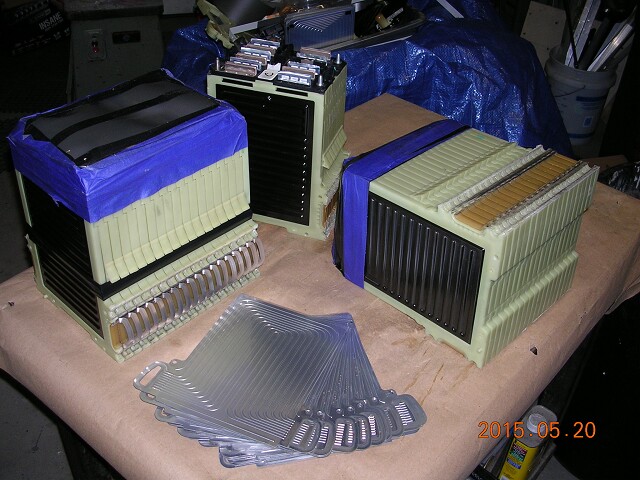 Close up of the aluminum dividers shows that they are laminated on both sides with clear plastic. 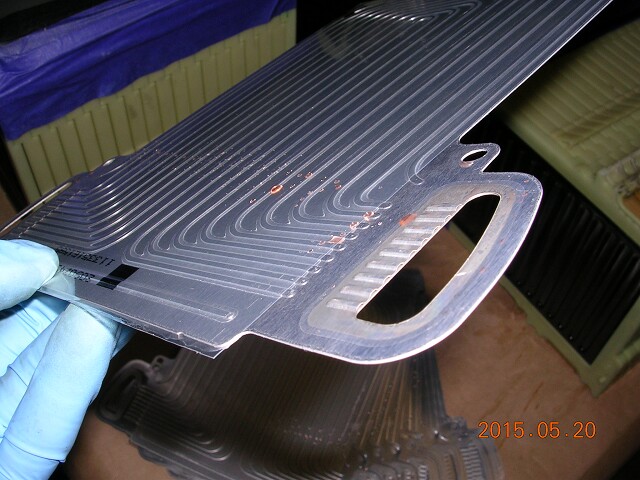 This shows that the opening where each aluminum cooling plate goes. There is a cooling plate between each cell. There is a rectangular foam perimeter to isolate the cell from the hard outer plastic. The Cells are pouch cells simular to A123 pouch cells. 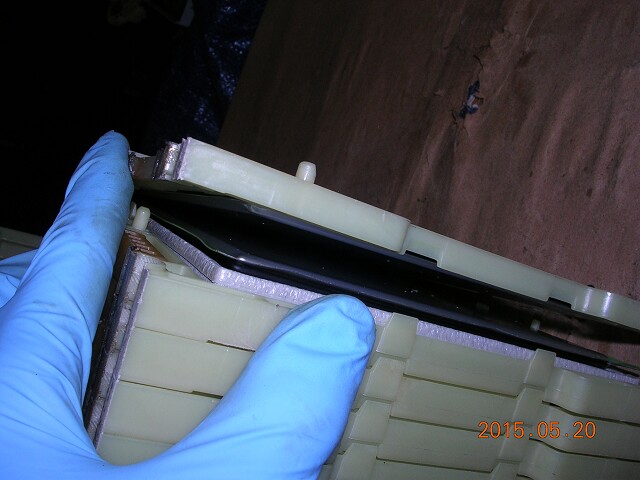 The width of the assembly with the bolts in place will be "perfect" for my 8 inch opening. The aluminum fins will contact the aluminum sides of the bike - hopefully wicking away some heat. 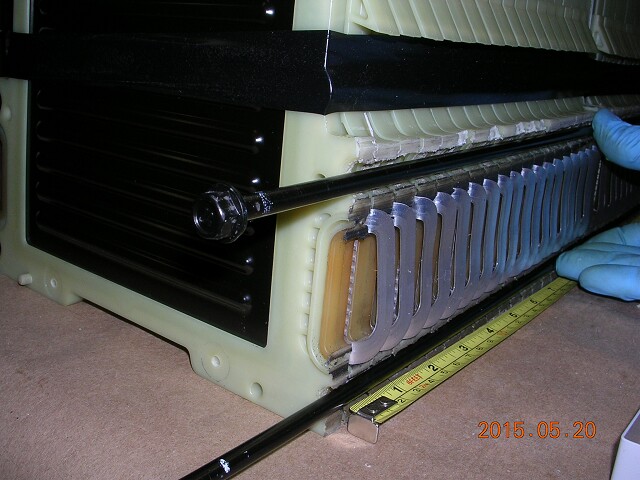 Will need 24" clamps to compress the pack to get it strapped back into a 23" long assembly. 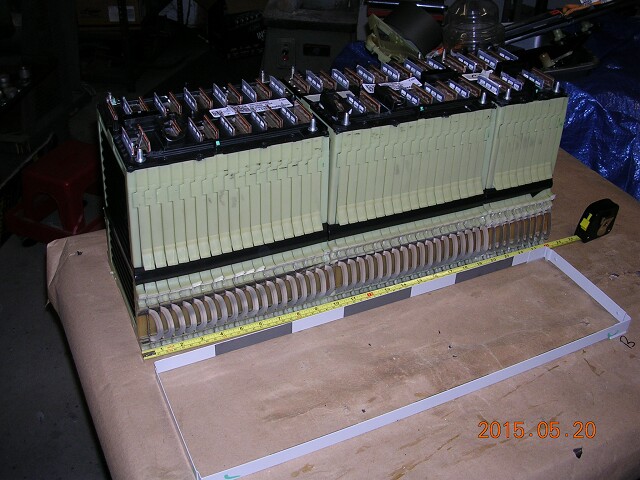 |
|
Removing individual Cells in Detail - May 23, 2015 I decided to limit my voltage range from 3.55 volts to 4.0 volts. Since my chargers charge to 55.5 volts and I'm running two "48 Volt" packs in series and I'll be charging the full pack to twice that voltage = 111volts. Divide 111volts/4.0volts = 27.75 cells. So, I'll need a pack with 28 cells. The packs are divided up in 12 cell and 6 cell chucks (note: each cell is actually 3 pouch cells in parallel). So, I needed to lose 2 cells somewhere. I decided that I wanted to keep my BMS connection ports functional, so the best place to cut off was the end 2 cells of the 6 cell chucks. LIMITED SPACE, EXISTING CHARGERS AND CONTROLLER, LIMITED BUDGET Were Constraints for this project: SPACE: For the Delta-11 proto-type, I had a space problem. I couldn't physically fit 30 cells in the bike, so I had to remove two unused cells. DON'T do this you your pack! Cutting up the pack was extremely dangerous to the cells and to the human doing the cutting (see details below in the May 23, 2015 entry)! Figure out how to use the system voltage as is. OPTIONS TO CUTTING UP PACK: You don't have to physically break a pack up to get a certain voltage. You can just use some portion of the cells and leave the other ones present, but unused. Or better yet, get a charger that allows you to charge to the perfect voltage (Here's an example of a nice programmable charger http://www.ebikes.ca/product-info/cycle-satiator.html ). EXISTING CHARGERS & CONTROLLER: Also, since I was on a limited budget and couldn't purchase programmable chargers, I decided to make a custom pack that had a voltage that was ideal for using my existing 48volt chargers and that best suited the voltage range of the cells and my motor controller.  First, I VERY carefully cut one of my 6 cell battery's open using a dremmel cut-off wheel to discover where the BMS wires were at. Once I knew where everything was, I was able to put a pack up on the mill and "cut" the pack apart precisely using a 1/8" diameter end milling cutter. 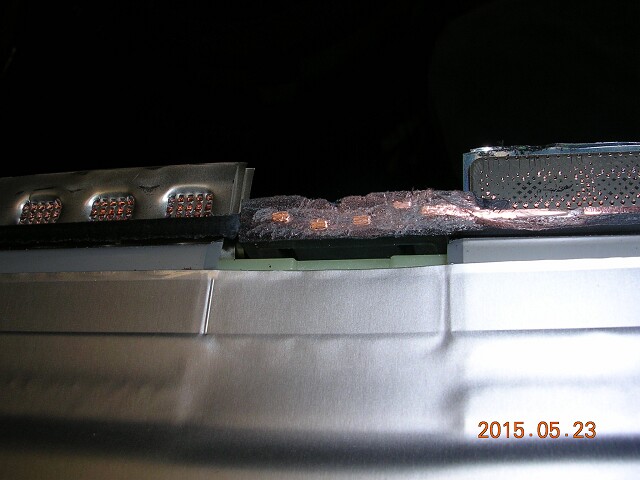  Here's what is inside. Each pouch cells is in direct contact with an aluminum cooling fin. Each set of 2 pounches is separated by an interesting foam edged plastic/rubber divider (perhaps a thermal barrier?). The order is, Thermal barrier, Pouch Cell, Aluminum Cooling Fin, Pouch Cell, Thermal barrier....Pouch Cell, Aluminum Cooling Fin, Pouch Cell, Thermal barrier, Pouch Cell, Aluminum Cooling Fin, Pouch Cell, Thermal Barrier...etc. This order is somewhat different at the very end of a 12 or 6 cell battery. At the end, there is a steel bulkhead plate that replaces the thermal barrier. 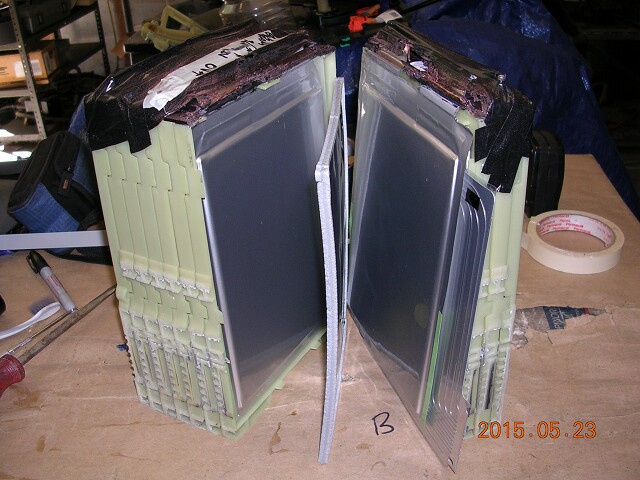 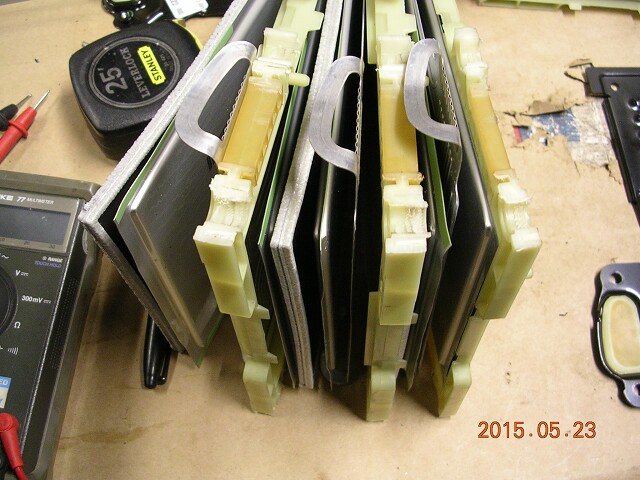 |
|
Closer to Mounting - May 24, 2015 Here are all the batteries from the Chevy Volt Pack chucked up into their final grouping. This combination of cells, makes three, true 96-volt batteries (each 4.66 kWh), and one less than 48 volt (2 kWh) battery perhaps for a bicycle or small moped project. 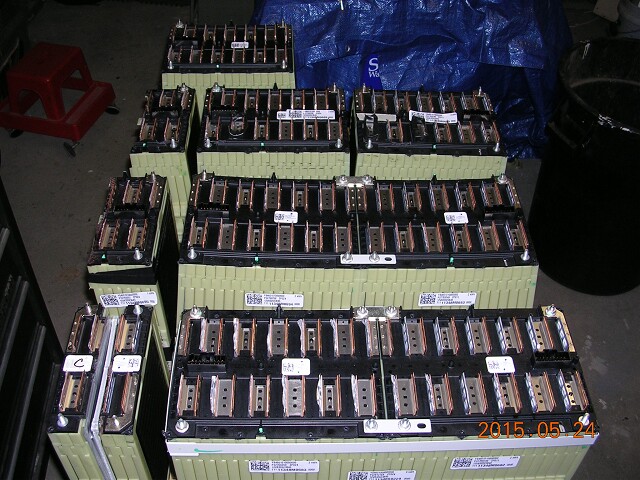 Here is the first 96-volt battery of 28 cells just about ready to go into the bike. All cells have been verified to have voltage within .01volts of each other. I still need to make pigtails that will allow plugging in Cell Log 8's to the BMS ports to allow casual observation of cell voltages during rides. 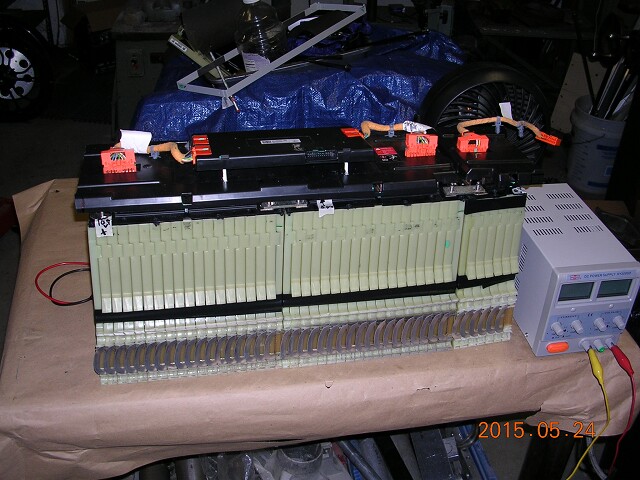 The bike is almost ready to recieve the pack. I had to move the controller and contactor back and remove the rear foot brake for now. I'll have to re-engineer the mounting for the rear brake, possibly ending up with it on the handlebars. I really like having a foot brake on a motorcycle, there are times you need to ride one handed and having a foot brake is a helpful thing then.  |
|
Batteries Mounted and Easily Removable - May 25, 2015 Remanufactured the OEM cover to work with the new configuration. 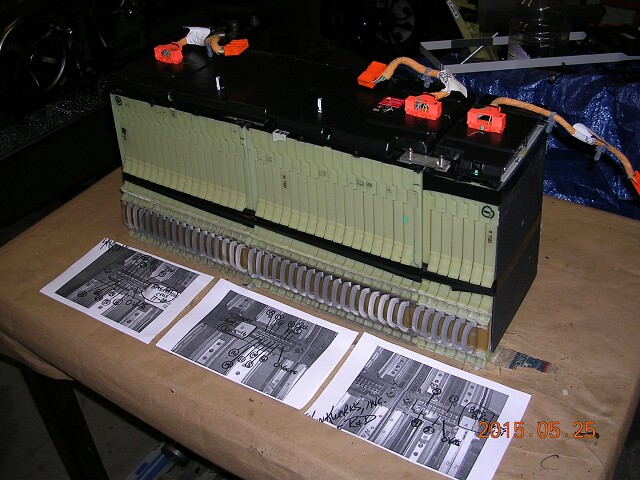 Mapped out the BMS port connections. 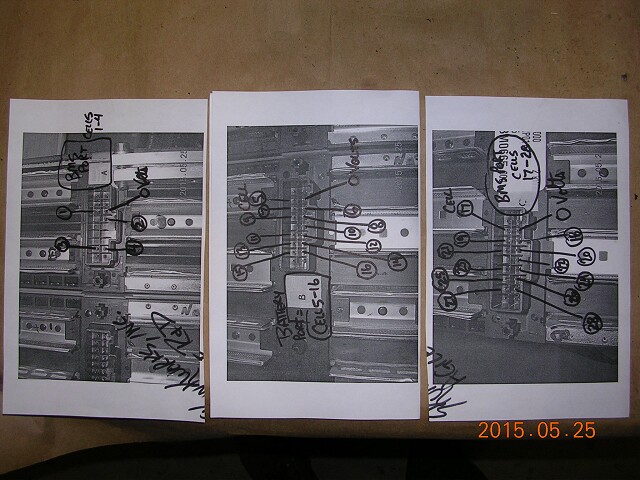 The hardest part about mounting the battery was figuring out how to make the pack easily removable for use in Spring and Fall in my electric car. I didn't want to have to disassemle the frame (which is possible because the frame is bolted together, but it is a lot of work). As, it turned out, because the battery pack is in three pieces, each piece can be loaded into the frame from the side if loaded/unloaded in the correct order. In the end, I was able to build one bracket that holds the rear of battery pack. For the front, I drilled 2 holes in front frame arms. The pack is fully attached and controlled using just 4 bolts (2 re-used from the Volt Pack). 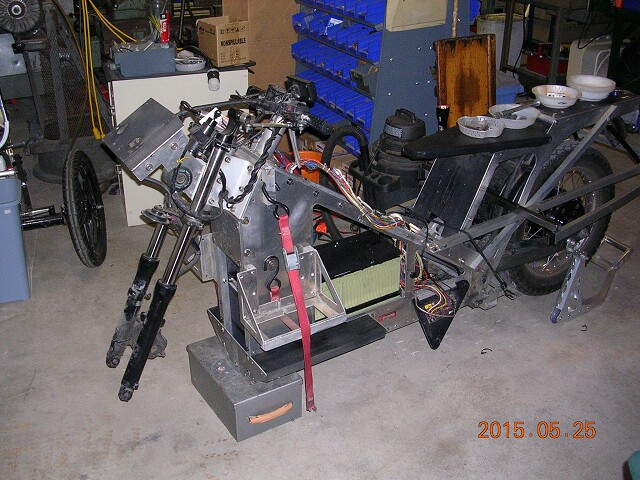 |
|
Work Day - June 4, 2015 Wired up a harness to monitor cell voltages with Cell Logs.  Did a test ride with 200# of batteries on the tail. Put in a heavier rear shock and that still is not enough. I need an AIR SHOCK! An air shock will help compensate ground clearance for my ever changing vehicle weight, and it would help me lift off and sit me on my centerstand when parking. 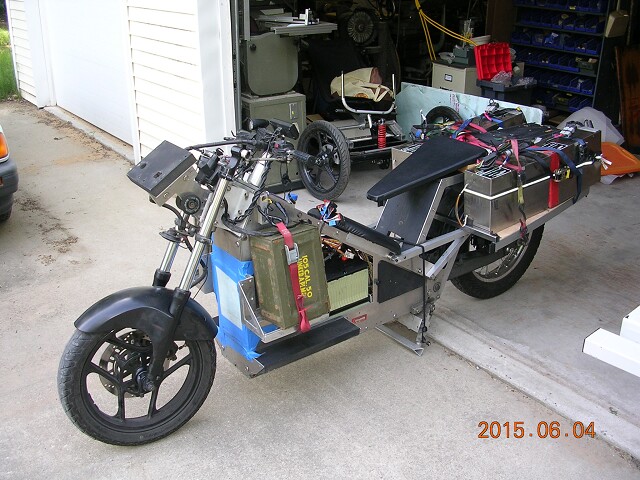 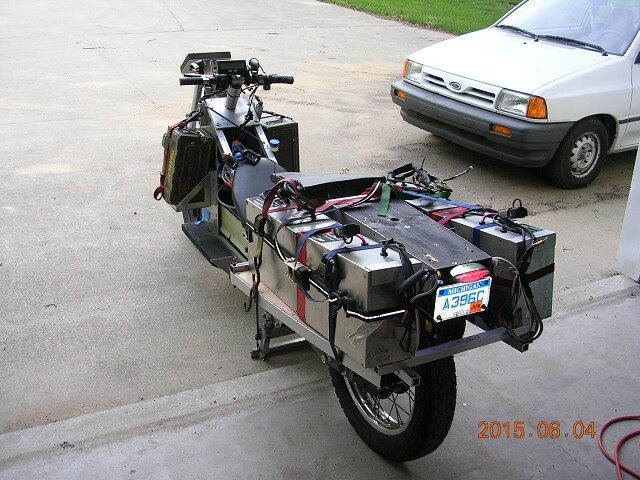 |
|
Misc. Conversion Work - June 2015 Wiring Diagram - maybe... 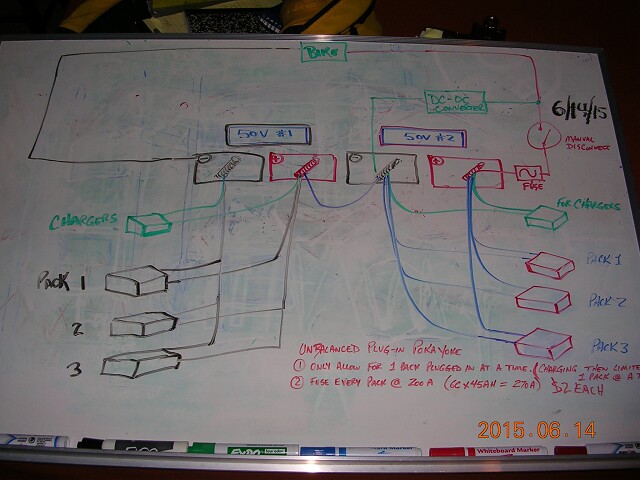 New rear brake pedal needed because this battery is wider. 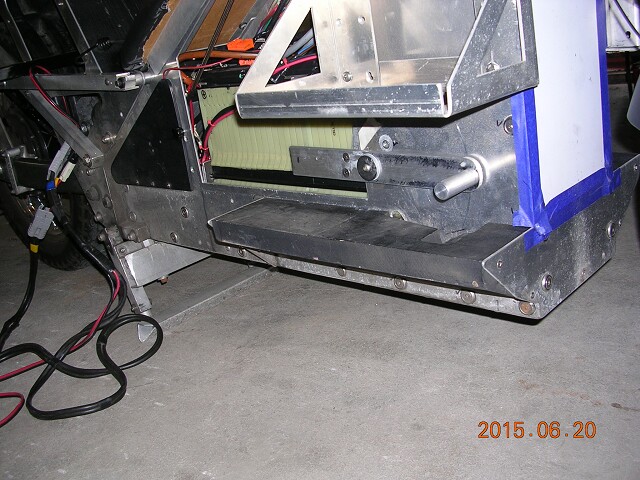 |
|
Blown Controllers - June 25, 2015 CONTROLLER #1 (3,900 miles) My first 2 controllers were donated by Current Motors back in 2011 when the bike was built. They were Kelly KBL12271, 24-120V, 270A controllers. The story of the FIRST TWO Controllers is: Ā For the first year (2011), and including the ride at Vintage days,ĀI hadĀmy controller set to a maximum of 80 amps.Ā That is 100volts x 80 amps = 8,000 watts = 11.7 Hp. Ā In 2012,ĀI experimented with the controller set at a maximum of up to 120 amps to get better off the line acceleration.Ā That is 100volts x 120 amps = 12,000 watts = 16 Hp Ā My Enertrac hub motor is capable of handling 40 Hp peak, but my batteries and controller were less capable.Ā My motor supplier reminded me that I was running my controllerĀtoo close to it's maximum.Ā "If you operate any electronic device at it max setting it will fail or at the least run unreliably. In mechanical systems its common to figure a factor of two or more safety margin and the same should beĀ done for electronics.Ā My advice: and this works get a KBL09401B controller set the battery to 50% and the phase at a maximum of 70% - Short of a infant mortality failure; the controller will last forever.Ā What you see on the battery side does not reflect what is going on at the phase wires. The peak currents can be huge and even when you see relatively low battery current - which is the average current the peak phase currents is maxing out at low speeds and high loads - hills.ĀĀ You have a heavy bike to be honest I'm surprised the controller didn't fail sooner... truth be told you have a undersized controller for the weight of the bike." On June 15, 2012, I rode my bike up and down "5 Mile" hill twice in a row, it fried the controller. My bike weighs 500lbs (it has 200 pounds of batteries).Ā And I can't complain, my controller lasted 3,939 miles before burning out.Ā I'm just glad I didn't burn it out during a "Vetter Challenge" ride. Ā CONTROLLER #2 (2 miles) The Story of the SECOND one is: It was a twin of the first, I put it in the bike after burning out number 1 and it did the same thing as number one within 2 miles. So, I thought that maybe the motor had gone bad and was either the problem, or was causing the controllers to burn out. Mark at Enertrac sent me a new motor, I ordered a new controller and because I didn't want to chance burning out my new controller with a potentially bad motor, I paired the new motor and new controller and returned the first motor to Enertrac with the first controller for diagnosis. 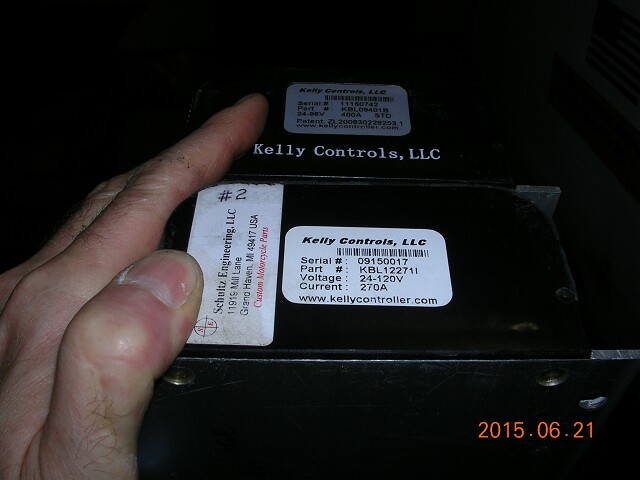 CONTROLLER #3 (9,000 miles): KBL09401B, 24-96volt, 400A, Installed July 7, 2012 and lasted for 9,000 miles (3,900 - 12,900). Documentation for this controller says it can operate up to 120volts. I'm still not sure what happened, but here are some of the details of the failure of #3 and how I "let the smoke out" of Controller #3 on June 20, 2015. Perhaps Mis-Wiring Damaged controller? New batteries were installed in bike. The controller was moved to a different location to allow more room for batteries and when the controller was hooked up the wires were connected incorrectly. There are three power wires going to the motor. One of those wires was swapped with the negative terminal on the controller. An overvoltage code was generated by the controller causing confusion and may have also damaged the controller. However, after the wires were put in the right place the controller worked perfectly for 150 miles. Perhaps programming at maximums damaged controller? With the new batteries with more C rating in place I experimented with cranking the controller programming up to the maximum settings. The bike was like a rocket ship! But, I was riding it like an idiot. The batteries could handle the extra power, but I couldn't so, with reluctance I turned the programming back down to a more reasonable level so that it would be impossible for my EGO to drive the bike and myself to destruction. But, did I damage the controller by having it set at maximum for 10 miles? After this testing, the controller worked perfectly for another 100 miles. Perhaps higher voltage damaged controller? Operating voltage range of the batteries was higher than the old set of batteries. The old batteries would charge to a maximum of 106 volts. The new batteries could charge up to 115volts. I did several rides (150 miles total) with batteries charged to a maximum voltage of 112volts. The very first time I charged the batteries to 115 volts and powered up the controller, Smoke came out of the controller, lots of smoke, and snaps, crackles and pops. Perhaps loss of Pre-Charge circuit damaged controller? Around the same time the controller went bad I had two contactors weld closed. I couldn't turn off the power to the bike because a manual switch (way under rated by the way) and my selonoid operated contactor (rated correctly) both welded shut. I'm not sure if the controller being shorted out caused the contacts to weld, or if the contacts being welded shut and thereby short circuiting the pre-charge circuit caused extra strain on the controller by powering it up at extreme high voltage with no pre-charge. But, it was scary having the controller sizzled in the bike and discovering that I had no way to turn the power off. I ended up removing the main fuse with lots of arching and sparking to get the bike powered down. 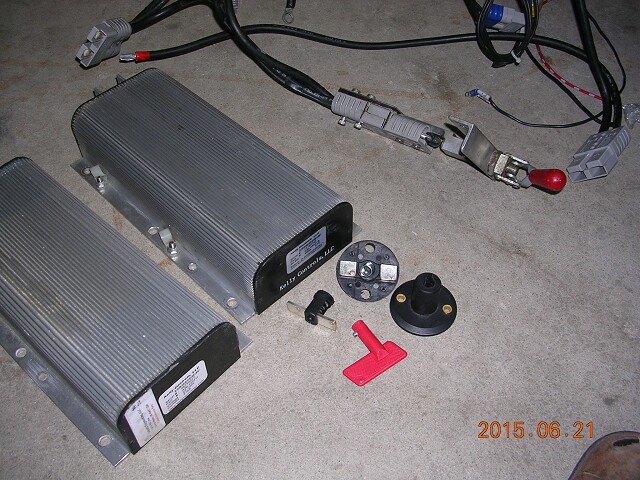 CONTROLLER #4 (TBD miles): I wanted to replace the burned out controller with a Sevcon Gen 4, Size 4 because it is a smoother operating controller and known for reliability. However, programming the Sevcon is a royal PITA, so I ended up ordering a Kelly KHB12401,24-120V,400A,Opto BLDC Controller/With Regen At $1,000 each these controllers put a lot of stress on my marriage! Just a reminder when designing your systems.Ā Figure out what your maximum needs are and then design your system for 2x that and put in safeguards to prevent you from going to the maximum in service.Ā It will result in a more reliable system. Ā It's so elementary, those maximum ratings really are maximums, and not something I am capable of respecting when I am riding.Ā I will take it to the maximum all the time when riding, if it's not programmed to prevent me from doing it. While the controller is down, time to work on other things, like paint touch-up and making sure I'm prepared to program and install contoller #4 correctly (fully de-rated and wired with safe-guards for the pre-charge circuit).  |
|
Pre-Charge and Switching Circuit - July 2, 2015 To make the bike waterproof, the old contactor needed to be replaced with something that wouldn't shut down the bike in the rain (the holding circuit on the Tyco relay would shut down with the slightest bit of moisture). Also, to ensure pre-charge is always done, I put in a simple manual precharge switch that physically prevents powering up the controller without activating the pre-charge circuit. I pre-charge to 95 volts (as displayed on the Cycle Analyst) before allowing full system voltage to the controller. Instead of having to balance battery packs every time when hooking them to the bike, I mounted a switch that isolates battery packs from each other. This way, the batteries are independant and can be used like cars and airplanes and boats that have multiple fuel tanks/batteries. I used a reversing switch from a golf cart to accomplish this. 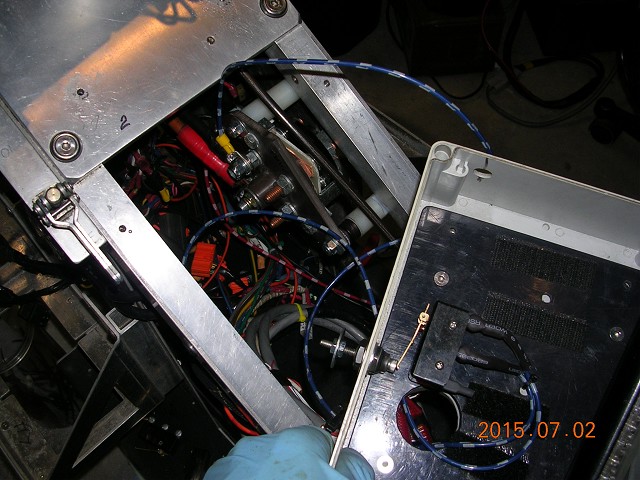 |
|
New Controller Installed and Tested- July 8, 2015 Controller arrived and was physically too big to fit in designed location in the bike, so instead of replaceing the spare controller I left it in place and mounted the new controller next to it. This way the spare is always handy in an emergency to limp home. 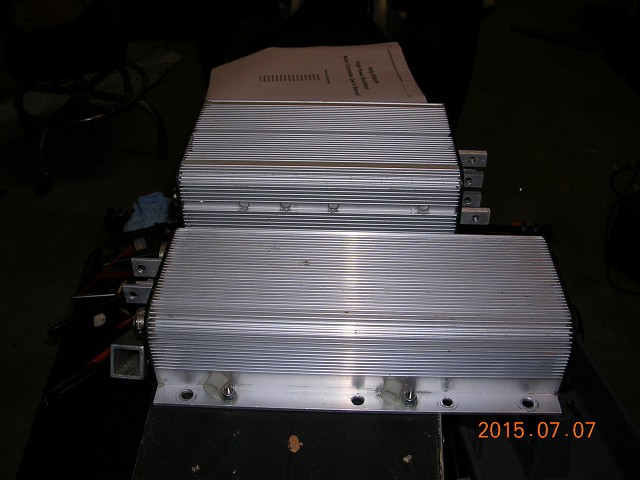 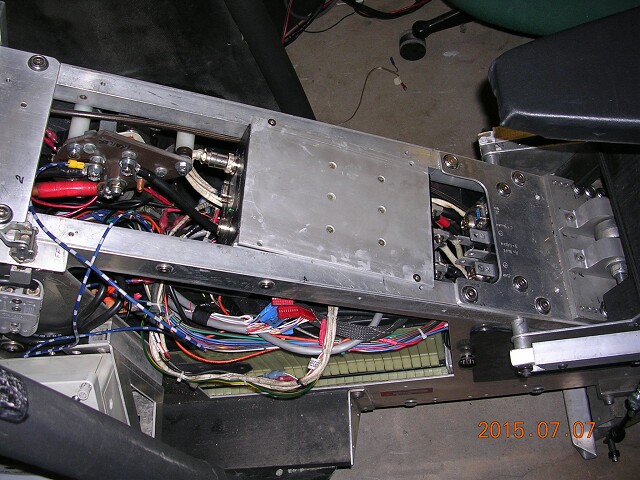 To give the bike a shake down with the new controller ran some errands. Here I am dropping off a dustbin fairing so my friends at My Trail Buddy can haul it to Vintage Motorcycle Days and attempt to sell it at the swap meet. This fairing cost close to $800 with shipping from Airtech. 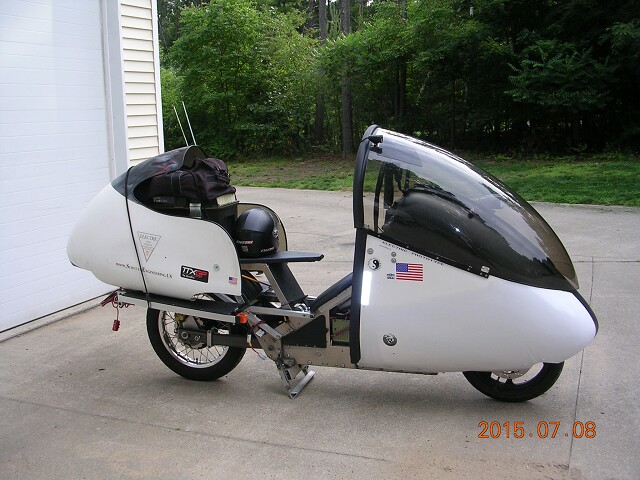 |
|
Modular Battery Packs Are Awesome - July - September 2015 The Modular battery pack has allowed much fun with the bike. The extra pack is packaged in a waterproof tool box with handles and an easy access lid for cell maintenance. The extra battery pack can be hauled with a trailer that is easy to remove and leave at various places for recharging or to make the bike lighter for certain parts of the trip. 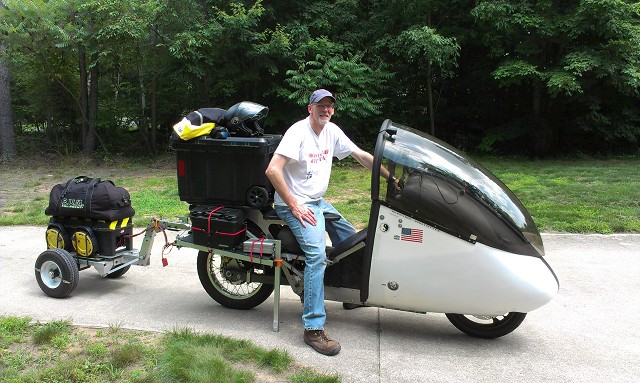 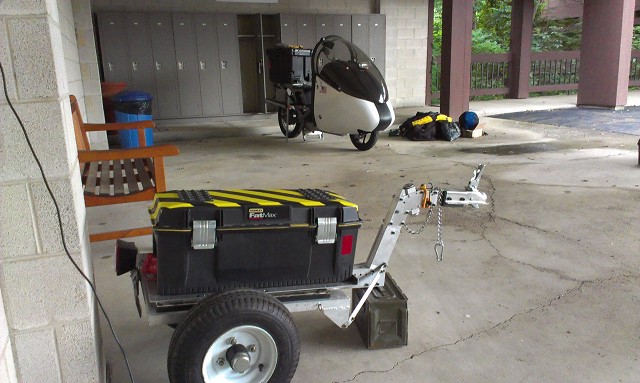 The extra battery can be mounted on the rear of the bike to extend the bikes range. In this example, the bike was used for a camping trip. 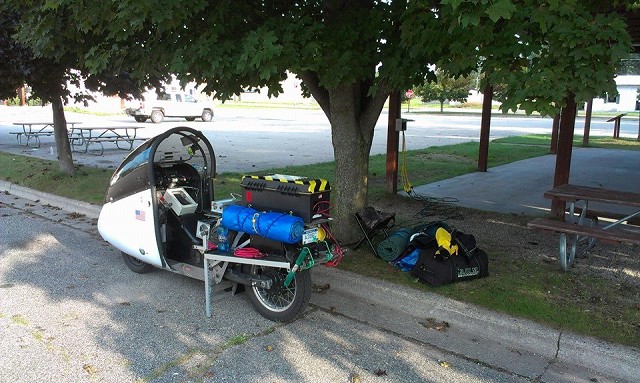 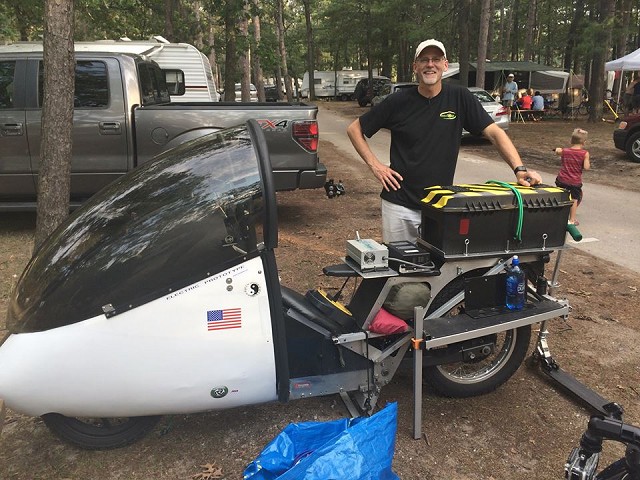 The extra battery pack can be left at home and bike ridden with passenger instead  |
|
Modular Packs Mounted in Ford Festiva Electric Car- October 18, 2015 Got two of three modular packs mounted in the Festiva this weekend.  |
|
(Next Page) |
|
Inventing a better tomorrow today... Copyright 2015, Schultz Engineering, LLC, written by Kraig Schultz |